Inredningen:
uppdaterad 2012-01-16
|
Citroën CX mekartips ->
Karosseri ->
Inredning
Inredningen: uppdaterad 2012-01-16 |
|
| Säkerhetsbälten | Till toppen av sidan |
Återspolning bälte
Kola 2008-01-13: Någon som vet om det går att justera återspolningen på bilbältet?
Zummi: Om du meiner at beltet går for seint tilbake, er dette enkelt å fikse. Trekk beltet heilt ut, og spray på silikonspray. Gjorde dette på alle beltene mine for nokre månader sidan. Som nye!
Robhol: Var ska sprayen sprutas på? På själva bältet? Blir det inte kladdigt? Är det någon särskild silikonspray som är lämplig?
Kalle1: Har köpt silikonspray på Biltema, det fungerade utmärkt utan att kladda.
Zummi: Berre spray direkte på heile beltet. Blir som nytt.
Kola: Tackar för tipset, det fungerade ju kanonbra!
Strengthen up
Johs K 2006-05-08: Has anyone tried to fix the return mechanisem in the safetybelts? Is it possible to strenghten it up a little?
Richard M: my trick was to swap the driver's side for the passenger one - on the basis that it would be less used and therefore have more spring in it. It returns a lot smarter now.
Sikkerhetsseler bak
Black Lemon 2007-08-17: Av alle ting har jeg fått mangel på sikkerhetsselene bak da rullemekanismen nok er utslitt. Har jo hatt barna bak her i en del år. Originalselene er ikke lenger å få tak i hos Citroën. Kan jeg bruke uoriginale og er det i tilfelle noen som har et tips? Torshov hadde noen som skulle passe til CX, men festepunktene så ikke ut til å stemme. Selve rullen er festet med en bolt til hattehyllen i tillegg til noen pins som stikker ned i noen hull der.
CitroenCX: Det som ofte skjer er at selene blir fulle av fett og mister fleksibiliteten, dette igjen gjør at fjøren som skal trekke de inn ikke blir sterk nok. Noen ganger kan de være så insmurt med iskrem sjokolade ketchup og unevnelige ting at de blir for tykke.
1. Skru ut selene.
2. Ta en bøtte og bland en sterk blanding av lunkent vann og såpe. Gjerne Bio Tex. Zalo virker også.
3. Legg selene i bløt og kryst/vri regelmessig en times tid. Hold mekanismen tørr!
4. Skyll godt.
5. La de tørke nesten. Men bare nesten.
6. Slipp de inn på rullen noen få omdreininger og rykk KRAFTIG.
7. Fortsett og slippe inn med kraftige rykk helt til rullen er full.
8. Gjenta ett par ganger.
Legg det hele et varmt sted over natten. (40-50 grader.) Tørk de på rull. Ikke strukket. Nå tørker de med et spenn som gjør at de vil helst være i rull om du skjønner. Monter. Gjenta inrullingen med kraftige rykk. Før og etter montering. Virker de fortsatt ikke må du bytte de.
| Inredning | Till toppen av sidan |
Luckorna i instrumentpanelen (CX serie 2)
L Hedborg 2002-04-13: Jag undrar hur man lättast byter de tre luckorna på instrumentbrädan på CX serie 2. Krävs mycket demontering?
Lucas L: Det är bara å bända å bryta lite med en skruvmejsel runt om facken så ploppar dom upp. Dom sitter nämligen bara med snäppfästen.
Thomas E: Däremot går de inte att reparera när luckans tapp har gått av på ena sidan och den lilla fjädern sprätt iväg och försvunnit. Man måste köpa ett nytt fack med lucka, men de tre byts separat. Jag hoppas att de fortfarande finns som reservdelar.
Björn K: Ja, eller så gör man som förra ägaren till min -86: skruva fast vanliga gångjärn (usch usch, det skallrar värre än nånsin). Men jag ska pula dit en liten fjäder nån dag så att luckorna åtminstone fjädrar upp av sig själva!
De tre luckorna (CX serie 2)
Putte 2002-08-13: Vad är egentligen de tre facken till för?
Svante: Förvaring av diverse små prylar -mynt i mittfacket - ursprungligen försett med en insats med myntspringor. I förekommande fall döljer sej manöverpanelen till färddatorn bakom den ena större.
Johan G: Snyggt OCH praktiskt!
Svante: ...men fruktansvärt klent utförande på själva gångjärnen(gångplasten?)
Mittpanelen CX serie 2
Alex H 2002-08-08: Hur i hela friden får man bort mittpanelen? Ska åt såväl kontakten till höjdregleringen som sladdarna till kupéfläkten men hittar inga skruvar! Hjälp! Jag håller på att koka bort i värmen!
Bertil: Sitter likadant som prylfacket mellan stolarna med små plastspärrar som man viker ut försiktigt med en skruvmejsel, samtidigt som man drar lätt i galleret. Om du tittar in mellamn spjälorna så ser du var du skall lyfta i spärrarna sedan är det bara att trycka den rakt in när den skall tillbaka.
Johan G: Ta ur askoppen, hjälp panelens låsklämmor att skutta över kanten på hålet.
Örjan: Börja med att plocka bort de vridbara ventilationsgallren, så att du blottlägger de två stora hålen i efter gallren. Gallren tar du enklast bort genom att trä ett snöre in igallret fiska ut det igen och förbinda ändarna så att du har ett stadigt grepp om dessa. sedan lyftes gallret i maxnivå, samtidigt som underkanten dras utåt, passupp för de rektangulära små fjäderbrickorna de kan lätt falla bort. De två blottlagda hålen ger nu utrymme för fortsatt demontering, i över kant sitter två metallbleck på höger resp. vänster sida i under kant sitter ett metallbleck mittpå, kan även bli åtkomligt genom demontage av askkopp.
Klibbig ratt
Gary M 2002-02-22: When I bought my 1980 CX about 3 years ago, the steering wheel looked a bit rough so I laced a leather cover on it. Recently I have noticed that it was feeling a bit sticky on hot days. Close inspection shows that the plastic from the wheel has squeezed through the weave in the leather cover. Can anyone suggest a treatment for the wheel to prevent this?
Scott R: My '76 does this, too. So far (8 years now!)I have just put up with it. If I could get a leather cover of just the right size so that there would be not annular gap, the problem would abe of less importance.
Gary M: This is probably a well know idea but new to me: car interior guy told me to wet the leather wrap before lacing it on the wheel so that when it dry it will grip down tight on the wheel and feel and look more professional.
Byta framstolar
Per W: Jag måste nu byta framstolar i min CX Break. Tips på hur man lättast gör detta vore välkommet. Skruvarna som går ner i golvet sitter ju stenhårt... måste finnas nå´t annat och lättare sätt. Har aldrig behövt gjort detta men nu är det dags så jag är som sagt tacksam för tips.
Ivar S: Försök inte ta loss skruvarna i golvet! Du drar bara sönder skallarna. Stolarna sitter monterade i underrredet med fyra insexbultar, en i varje hörn. Det är bara att skruva loss dessa underifrån och vips så är stolen loss! Om du kör fram stolarna längst fram, kommer man åt de bakre två bultarna. För bättre åtkomst av infästningarna, skruvar man med fördel bort stolarna från sina respektive underrreden. De sitter skruvade med varsina fyra insexskruvar (som har rostat fast, inne i bilen!) som är skruvade uppåt. De är lite svåra att komma åt men om man kör stolarna i längsled går det bra. Det går naturligtvis fortfarande inte att ta loss mattorna men nu kan man försöka lossa skruvarna. Jag har fått borra ur mina bultar och ersatt de med vanliga muttrar och nya bultar. De inre bultarna brukar det inte vara några problem med eftersom de sitter i fastsvetsade muttrar men de yttre sitter i "flyttbara" muttrar som brukar börja rotera hellre än lossna. De yttre bultarna sitter dessutom ute i vägsaltstänket från däcken.
Bosse: Om det inte går att få loss, ta vinkelslipen och ersätt sen med nya bultar och muttrar.
Byta framstolar 2
Jan Å 2001-09-02: Förarstolen är sliten. Är framstolarna lika, kan de byta plats?
Hege (N): Nei. De har forskjellig oppbygning (passasjersetet er lavere) og hva skal du gjøre med hendlene som da kommer på feil side?
Anders (DK): Jo det går endda, men ikke direkte. Du må plukke især begge stole, og da bytte over alt det mekaniske. Det bedste er nok at finde en passagerstol i bra skick på skrotten, og da tage med førerstolen, uanset skick. Da kan du bygge op både stolene med de fine justeringsmuligheder. Det har jeg gjort på min 22TRS, og det giver jo lidt mere luksus. Men f..... til arbejde med at plukke især og bytte over, så alt sidder på rette sted.
| Rengöra klädseln | Till toppen av sidan |
Fräscha upp klädseln
Johan S 2001-05-07: Jag har just köpt en CX -84 och undrar var man kan få tag på en ny klädsel. Originalklädseln är i detta fall grå och väldigt smutsig. Fanns det många olika färger att välja på när man beställde dessa bilar? Och hur dyrt kan detta komma att bil?
Ulf: Om du inte har något emot den grå färgen - varför inte göra som jag: haka av den och köra på 30 grader i tvättmaskin? Den blev som ny!
Fräscha upp klädseln
Roland M 2008-04-20: Da har jeg tatt mot til meg og gått løs med AutoGlym Interior Shampoo innvendig i den grønne Breaken. Det er jo en del mørke flekker på det lyse, lekre interiøret fra tidligere eiere. Så langt ser det ut som om stoffet som er brukt til gulvteppet og i bagasjerommet responderer godt på behandlingen - flekkene forsvinner helt eller delvis, og det blir ikke skjolder eller skader. Men på dørtrekket(som vel er av samme type som setene) var det vanskeligere å få bort flekker uten å skape skjolder. Om det skyldes meg, Autoglym eller substansen som har skapt flekken, er vanskelig å si. Noen som har erfaring med å rense det lyse TRS/TRD-interiøret på serie II? Evt. prøvd andre produkter enn AutoGlym?
Jonsto: Jeg føler i grunnen at jeg er kompetent til å si noe her. Etter å ha drevet med bilpleie/Tidy Car i seks år og nå med innvendig rens av både biler og båter. En tepperensemaskin er cluet. Med møbelmunnstykke. Vaskemiddelet er det samme som brukes på tepper. Spray først på flekkene og børst med en kost eller neglebørste. Så "skrubber" du med maskinen. Den sprayer vann og suger samtidig. Da skulle det bli så bra som det går an å få det. Sug så tørt det lar seg gjøre uten å spraye vann til slutt. Men vær klar over at slitasje også kan gi fargeforandring.
Citro1CX: Jeg tror den beste måten å få setetrekkene rene er å montere de av setene og vaske dem i vaskemaskina. Jeg gjorde det med et sett med beige/hudfarget trekk. Resultatet ble bra. Jeg brukte flekkerenser på de verste flekkene og brukte en negelbørtste for å få de helt rene for oljesøl. Oljesølet var forresten vanskelig å få helt bort. Deretter ble de vasket 2 ganger på 60 grader med tøymykner. Det er jo en del arbeid med å få de av og på, men det er verdt resultatet. Har du en neseringtang går jobben med å montere ganske lett. En bonus med denne metoden er at du også kan vaske skumgummien i setene, jeg dynket disse i ajax og spylte dem med hageslangen etterpå. det er en utrolig følelse å sette seg i setene etterpå ...nesten som nybil :D
Snygga till bagagerumsbeklædningen
Peter B 2001-05-26: Jeg har smuds og vandskjolder på bagagerumsbeklædningen og vil nu gerne have det til at fremstå mere indbyende. Er der et godt forslag?
Anders N: Utan att veta exakt vilken kvalité och utförande det är på mattan till en CX är mitt spontana förslag att du plockar ur hela mattan ur bagageutrymmet för rengöring. Fyll upp badkaret med hett vatten och töm i vanligt tvättmedel i lämplig mängd. Nu kan du tvätta mattan på ett effektivt och bekvämt sätt. Du kommer att bli förvånad hur rent det blir. Om det fortfarande finns fläckar kvar kan du använda något av de fläckborttagningsmedel som finns på marknaden. På en gammal Opel jag hade var det en beige heltäckningsmatta i hela bilen. Mattan hade blivit mögelangripen pga att bilen läckte in vatten. Jag plockade ur hela inredningen och lyfte bort mattan. Därefter fyllde jag upp badkaret med vatten och Klorin (Klordesinficering) där mattan fick ligga någon halvtimma. Sedan sköljde jag ur mattan och upprepade tvättningen med vanligt tvättmedel. Jag trodde att heltäckningsmattan skulle blekas av denna brutala behandling men förvånades av att mattan behöll sin fina beiga originalkulör. Kontentan av detta är att Opels heltäckningsmattor av sent 70-talssnitt är av hög kvalité och att jag inte har en aning om kvalitén på CX-mattor.
Skinnklädsel m m
Harry S (US) 2001-08-26: Someone had a recommendation for softening up aged leather seats. What was it? Hide food?, Lexol, Saddle soap? What is best for deep softening?
Gary M: I used a lot of Lexol, but now my front seat is rotting a bit. But it might have been a case of too much too late though I used it before.
Jason L: Personally I'm ambivalent about Lexol. This is good stuff: http://www.leatherique.com I use it sometimes when a car needs serious treatment. Just remember to let is soak in an bake in the car. Its not cheap though....
Lou: On hard, stretchening old leather, i used saddle soap, then walrus grease (or sea lion grease, well that kind of fish). It stinks a lot & I did that at a time the seats had been removed to be resewed (leather go stretched, then it blows seams). I had improvement on suppleness. Anyway, I have a rare collection of palenblanket in the car to cover the seats when parked under the summer sun (coming soon). But I know there is another cream, or animal oil wich is used by english connoisseurs on they old Bentley (pre WWII, obviously) or any british classic car. but don't know exactly the name of the produce. Some says it's never too much too late, if you fid the adequate produces. Anyway if the leather is blown...
Gabor D J: I found the following in the BMW 7 Series FAQ a few years ago (the products mentioned are mostly US):
5.3: Leather/Vinyl Care
From: CarcareSp@aol.com Date: Mon, 18 Sep 1995 09:25:22 -0400
I am enclosing an article I wrote on the care and feeding of leather/vinyl. One section covers the restoration of seats/dashes.
The care and feeding of the leather and the vinyl components of your automotive interior are two very different processes. If you are using one product on both, that is somewhat like using gasoline as a lubricant. It will work, but not for long. I will cover the care and feeding of leather and vinyl separately.
Leather having once been used to keep the insides of a cow from falling out was designed to pass moisture through tiny pores. These tiny pores absorb human perspiration and as the water evaporates, salts contained therein remain to absorb the essential oils in the leather. This accumulation of salts and other grunge should be cleaned from the leather about twice a year (more often if the seats get more than their fair share of your leftover sweat). The loss of oils within the leather is the first step to hardening, cracking and shrinkage. Leather dashes are very prone to hardening and shrinking. Your dash is subjected to the destructive UV rays and heat concentrated by the windshield. The leather (or vinyl) of your dash rests upon a metal backing that acts like a frying pan. This "frying" drives the essential oils from the leather causing premature shrinkage, cracking and hardening. Thus a dash should be treated more often than the seats or door panels.
Cleaning leather may be accomplished by using a mild soap and water, or a specifically designed leather cleaner. Of all the products I have tried, I still like Lexol pH Cleaner. It is pH balanced, and gentle. All cleaners will rehydrate the leftover salts and grime and wash them from the leather fibers. Use only leather products on leather, do not use vinyl cleaners as these products tend to be much harsher and may not be that beneficial to the leather. Any cleaner should be rinsed thoroughly from the leather. I have tried spraying off with a hose, but that just seemed to fill the car with soapy water (a hole drilled in the floor was needed to drain it out - just kidding). I went back to using a damp cloth and repeatedly wiping down the leather. Once the leather is clean, a conditioner should be used to restore lost oils and emollients. There are several conditioners on the market. Two of my favorites over the years are Lexol Conditioner and Tony Nancy Leather Conditioner. These two seem to be the most easily absorbed into the leather fibers and tend to leave a relatively less "greasy" finish than any of the other products I have tried. Another good product is Connoly Hide Food. This product is made from rendered animal parts and will turn rancid in about two years. This and the distinctive "cow" smell removes it from my top two list (I spent too much time milking the south end of a north pointing cow, so am not a fan of cow smells). Zymol makes a product called "Leather Treat". It does not, in my humble opinion, do any better job than the much less expensive Lexol or Tony Nancy products. Again, do not use a vinyl product as a conditioner on leather and above all try to avoid silicone based products. The silicone oil will dissolve out the leather's natural oils and tend make the leather sticky. Silicone has a very high electrostatic attraction, so will invite every dust particle within miles to set up camp in your interior. Apply the conditioner to a soft cloth and work into the leather, allow to be absorbed into the fibers and then buff off the excess.
You may condition the leather as often as you wish. The leather will tell you if you apply too much or apply too often. The leather fibers will just not absorb the excess.
If your leather has hardened or needs some intensive softening, there is a really nifty product called "Surflex Leather Soffener". This product is made from natural and synthetic oils that restore the natural softness to neglected leather. Clean the leather and then apply a liberal coat of Soffener. Allow to penetrate the leather for about 24 hours. Wipe off the excess. If it needs an additional application, repeat the above. For really bad areas, cover with plastic and allow to sit for a few days. Once the leather is sufficiently softened, allow to "cure" for another 24 hours and buff off any excess. You are done. I jokingly say this product will turn a dog's rawhide chew into a kid glove. I have had some luck with leather dashes with this method. Once the leather has softened, I have been able to gently tuck it back under the edges of the trim and windshield clips. This is a lot cheaper than a new dash and may be worth a try before spending a ton of money.
If your leather or vinyl has scuff marks, scratches or areas that the surface color had been removed, you may refinish it yourself The key is another Suflex product. The Suflex Colorant & Finish for Flexible Surfaces may be matched to the exact color required. Any interior leather or vinyl surface may be refinished. It is not recommended to spot finish any area. If your seat bolsters have belt loop scuff marks, you should refinish the entire front of the seat. I usually do from welting to welting. This provides a visual break that does not make the non refinished areas appear quite as shabby. But then why not do the whole seat, dash, or door panel? Start by cleaning the area(s) to be refinished with a suitable Organic Solvent. I prefer Wurth Citrus Degreaser or P21S Total Auto Wash. Prior to usage, test all solvents on an area that does not show. I use the excess on the underside of the seat to test colorfastness of the finish. Spray the solvent on a soft lint free cloth, and then wipe down the surface(s). Repeat after a few minutes. Rinse with a damp cloth and allow to dry thoroughly (at least 24 hours). The manufacturer of Surflex says to strip the old finish off using lacquer thinner, commercial paint remover or C-P Stripper. I don't, because most interiors are not in that bad a shape and I have never found it necessary (They also recommend lightly sanding the area prior to usage, I don't do that either - no guts). Mix the Surflex completely and use it like a wood stain. I use a small piece of lint free cloth and work the Surflex into the leather or vinyl just as if I were staining wood. Once the desired color of finish is achieved, allow to dry undisturbed for at least 24 hours.
I allow the surface to "harden off" for about 2 weeks before applying any conditioners to leather or vinyl protectants to vinyl parts. I have not had a lot of luck refinishing a dark leather or vinyl a lighter color. The old color tends to show through in small "cracks" and the whole panel seems to be "muddy". Maybe if you strip off all the old finish, it would look better. Someday, I will get an old seat and give it a try.
The Surflex Black Colorant works great on black bumpers, black spoilers or black rubber/vinyl trim that has been scratched or scuffed. Clean the entire part thoroughly with Wurth Citrus Degreaser, rinse and dry thoroughly. Stain the area with the Colorant and allow to dry. It will look like new. After about 3 weeks hardening off, coat with a protective coating of Mequiar #42 Rubber Treatment or Black Again.
Small cuts, cracks or holes in leather may be partially repaired using another Surflex product called Flex-Fill. This is a semi-flexible cosmetic filling material. You use it like a spackle compound. It will take the Surflex colorant similar to leather or vinyl. I have been able to repair several damaged areas and hide them so they are not visible to the casual observer. Will it make a three inch crack in your dash look like new? No, but it may help hide it so that it isn't quite so obvious. I have found that forcing Flex-Fill under the repaired area and forming an inverted T patch works best. Once the patch is dry, sand lightly to blend in with the leather or vinyl. Clean the area thoroughly and refinish with the Surflex Colorant.
This is a learned skill, so you should practice on a test piece of leather or vinyl. Perfect your techniques before you tackle your expensive interior.
Vinyl is the carefully prepared hydes of virgin pampered Arctic Naugas. Many Naugas must die to furnish enough material for just one interior panel.
The dash, door panels, seat backs, and numerous other interior/exterior trim pieces are usually vinyl. Vinyl may be viewed as raw semi-liquid vinyls that are held in place by a solid vinyl "skin" (this description is forillustration only and not a PhD chemical dissertation ).
The dash and other vinyl parts of your car are constantly bombarded by UV that breaks down the molecules of the skin, allowing the raw vinyls to escape (off-gassing). These free vinyls then may deposit themselves on the glass, forming a haze that is difficult to remove. If you have such a haze, it is probably your dash that has decided to pick up stakes and migrate. Silicone based vinyl dressing products do not usually contain UV protectants, and the silicone may act as a magnifying glass, intensifying the UV degradation. Silicone oil may also dissolve the essential oils in the vinyl skin, hastening the premature formation of cracks in the vinyl skin. A quality vinyl protectant will contain a UV protectant and essential oils to replace lost oils from the vinyl. These protectants are expensive, so the K-Mart specials may do more harm than good. Silicone also has very strong electrostatic attraction which may be considered beneficial in that it will tend to stay where it is placed, but will also attract every dust particle in the surrounding three counties.
Any vinyl protectant should be applied to a soft cloth and worked into the surface. After a few moments of allowing it to work into the surface, buff off the excess. The dash should be treated more often than any other area, as it is subject to the most severe attack by UV and heat. My personal favorite vinyl protectant is Lexol Vinyex Spray. This in my humble opinion has it all. A very strong UV protectant, essential oils, anti-static (helps keep dust off) and a soft patina finish. Harly Polyguard - - This used to be my favorite, till I lost my heart to Vinylex. Leaves a touch more shine to the finish than Vinylex. Somethin' Else This is the sister to Black Again. Has all the right ingredients and people who love it are died in the wool. I prefer the Vinylex, but that's only a subjective opinion. It leaves a "new car" smell. I think that is why it is not my favorite. I am not a fan of artificial smells. Harly Interior Magic - An old standby that leaves a lemon scent. Some people love it. I don't think a car should smell like lemons, but that's my opinion and I could be wrong.
Zymol Vinyl - Another tropical oil product. Leaves a pina colada smell. Diehards will defend this product to the death. I just think it is to much $. Meguiar #40 - A great product that cleans and protects. Does not leave a slippery finish. Meguiar #39 - A very strong cleaner. This should be used carefully and very infrequently. It will clean just about anything out of vinyl. Must be followed by #40 or other vinyl protectant. A great cleaner for plastic Targa tops. Tony Nancy Rubber/Vinyl Cleaner- I don't recommend use on the inside. The smell is a bit much for me (reminds me of dead rats).
Some people do and swear by it. Sonax Cockpit Spray - This is a German product that is designed for German vinyl. Does a great job, but leaves a little more shine to the surface than I care for. There are a gaggle of users who love it. Wurth Cockpit Spray - ditto above. Wurth people don't like Sonax and vice versa. Formula 303 - This leaves an Armour All type of high gloss shine to the vinyl. I personally don't like this type of finish. Some people do, so feel comfortable using it. All of the above products are not based upon silicone.
I hope that the above has shed some light on the subject leather and vinyl care. If there are any questions, please do not hesitate to call or write. If you can't find the products locally, I stock all of them except the Formula 303 and would be glad to send a product description/price package by mail.
Larry Reynolds, Car Care Specialties, Inc, e-mail carcaresp@aol.com
| Innertaket lossar | Till toppen av sidan |
Renovera innertaket
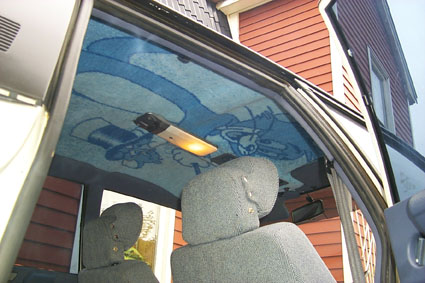
Mikael G 1999-06-05: Renoverade innertaket i min CX20. Tog bort det gamla tyget där limmet lossat och som hängde ned och klippte till ett nytt tyg av en fleecepläd med mönster som barnen gillar och limmade detta mot orginaltaket. Uppskattat och mysigt!
Sturla 2007-11-22: Datteren min hjalp meg velge ut fleece. Hun er fem år. Det er faktisk fint (om man ser bort fra mønsteret, lovlig hippie) det slutter pent om alle konturer og er rent og helt, men om man vil ha det mer konservativt er det gjort på en time å legge på annet/originalt stoff. Det som var originalt var inngrodd skittent, revnet og hang ned i laser.
Jeg gjorde en tabbe og brukte kontaktlim på boks som man stryker på - det luktet i et år minst. Bruk 3M spraylim - sterkt og raskt og effektivt. Finnes for bilinteriør etc. Ellers var det bare å skrape av skumgummi med stålbørste og lime i vei. Fleece fungerer veldig fint, jo tykkere jo bedre. Er man fin på det ville sikkert et godt pledd i merinoull være pent, det er jo alle muligheter for å velge selv. Ull er jo ikke ildsfarlig heller.
Fastlimning af loft i CX
Jens L 2005-11-09: På CX-en har stoffet på himlen løsnet sig, som det kan ses under en af garagereportagerne. Grunden til dette problem er ikke, som man kunne tro, at limen er ophørt med at virke, men snarere, at det skummateriale der er mellem loftpladen og stofbeklædningen er begyndt at smuldre. Når vi nu skal i gang med at klæbe nyt stof på loftpladen og alle stolpebeklædningerne, er det så smartest at lægge et nyt lag skum ind imellem, eller blot at beklæde pladen direkte, evt. med noget lidt tykkere stof end det oprindelige? Shans: Udskiftning af himmlen i en Cx´er er super nemt. Som du så rigtigt skriver Jens, et det skummet mellem selve pladen, det er limet op på og stoffet, der smuldre bort. Du kan bruge alt typer stof evt. med på limet skum, men eneste krav er, at stoffet skal kunne "strækkes" lidt, så du kan få det lagt pænt rundt i alle de fordybninger der er i himlen foran. Jeg købet stoffet til min himmel hos Cx basis i Tyskland, da jeg ville have den originale farve .... go daw do! Gav 700 kr. for det og kunne ligeså godt have gået ned til den lokale stof forretning i Køge og have købet det til billiger penge, nå men det var et side spring. Du demontere solskærmene og alle de paneler der sider langs himmelen. Bag loftlampen, sidder der 2 skruer, der holder himmelen. Når de er væk, hænger himmelen på 4 plast kroge. Fjern nakkestøtterne på forsæderne, læg dem ned og tag himmelen ud via en af bagdørerne. Når du har himmelen ude, fjerner du alt det gamle løse skum du kan, da det kan ses igennem det nye stof, hvis det er af et syndt materiale. Når himlen er renset af, smøre du lim på. På CX basis´s hjemmeside, anbefalder de kontaktlim. Lad være med det!!!! Det sviner af h..... til. Jeg læste et sted om en, der havde brugt tæppelim. Det virker, er billigt (ca. 100,- kr. for en liter) og kan vaskes af uønskede steder med alm. vand. Lad det hele tørre natten over og montere himmelen i omvendt rækkefølge. Hvis man trækker tørretiden fra, tager det ca. 2½ time for uøvede, at demontere/ montere himlen igen. Piece of cake 
Fastlimning af loft i CX
James P 2007-05-09: Hvad bruger man til det?Shans: Jeg satte ny himmel i min CX for ca. 2 år siden. Jeg bestilte nyt stof hjem fra CXBasis i Tyskland, da de havde stoffet i blå. Det viste sig desværre ikke og være samme farve, så jeg vil anbefale dig og gå ned i din lokale stofforretning med en lille prøve og finde noget stof der matcher. Vælg noget stof, som er lidt tykt og som kan strækkes, så du kan få det ned i de fordybninger foran ved solskærmene. Start bagfra på det flade stykke og arbejd dig fremad. Til montering af stoffet, vi jeg anbefale tæppelim og en bred pensel. Det er billigt ( ca. 100,- kr. for en spand på 1. ltr.) og kan købes i din lokale tæppeforretning. Fordelen ved tæppelim er, at det er 10 gange nemmere og arbejde med end kontaktlim . Det tørre ikke så hurtigt, du slipper for alle de tråde, som kontakt lim giver og evt. overskydende lim, der trænger igennem stoffet, kan vaskes af med vand og tæppelim misfarver ikke, når det tørre op. Selve arbejdet er meget nemt. Fjern alle de lister/ paneler, der sidder hele vejen rundt langs loftet, samt solskærmene, bagspejl osv. Under selve loftslyset, sidder der to skruer, der holder hele himmelen på plads. Når der er skruet ud, hænger himmelen på fire plast holdere. Himlen kan nu skubbes ud over disse og lirkes ud gennem en af bagdørene. Tip tag alle nakkestøtterne af og læg forsæderne ned. Hele arbejdsgangen demontering og montering, minus tørre tid, tager ca. en time. God arbejdslyst!
 Nyt stof m/ skum på bagsiden.
|
 Gammel himmel
|
 Ny himmel
|
Limma nytt tyg på innertaket
James P 2007-08-06: Without really intending to remove the headling I have! I set about investigating my sagging headcloth and have found it just to easy after removing the sunvisors etc, to wip the whole thing out and remove it via the rear door. What do I do next? The headcloth is off the backing board there is a lot of dry dusty foam that I have got rid off, should I just stick it all back with something like copydex? I have tested it on a bit but it not just dry yet? Should I use some sort of addition layer in between the fibre board former and the headcloth, I was thinking about a piece of an old bed sheet or something similar. Anyone done this and had a good, wrinkle free outcome? I also see that the front edge trim strip is broken in a couple of places, its curved to follow the window shape so I guess its just a question of sticking it back in place. Don B: Did my own last year with good results cost about £100 for cloth and adhesive.
Adrian C: Don't use copydex or other "general" glues - get hold of the proper stuff, sold by proper car trimmers. Also use proper car headlining material. www.woolies-trim.co.uk seem to be about the best here.
Marc B: Don't reuse the old cloth. Without the proper backing glue will easily leak through. It will also need flexibility (stretching capability), to follow the curves of the headliner backing, mainly around the sun visor stow away areas. I used carpet glue to stick the new cloth to the old backing (remove residues of glue and old backing first), but maybe special glues are also available for this purpose. With new cloth, the job is quite easy and straightworward.
Ted P: 3M Super 77 works well. Make sure you mask properly to block the inevitable overspray.
Freda V: We also used carpet glue, the kind for gluing indoor/outdoor carpet. It's been years now, and the headliner looks as good as new. Indoor/ outdoor carpet glue can stand heat and cold and damp. Any other glue we used, even those considered the best on the market, did not work well.
Renovera innertaket
Marc Boncz' Citroën Pages: In most (Series 2) CXes the lining will start hanging down, as the glue that has to keep it fixed to the roof will deteriorate. To solve this problem I first tried applying sprayable contact glue. This didn't work for a long time though. After a while the problem came back. So I decided to fix this rooflining in a more durable way. And looking as if it is factory-done of course...
The best way to restore the roof then is just take it out, and put a new upholstering on the old base. Taking the lining out can be done by one of the rear doors, as shown on the photograph. In the Prestige models (of course the Prestige had its rooflining hanging down as well) this is even easier as the rear doors are longer.
Just set the driver's seat as far backward as possible, the rear part of the seat as much down as possible and then tilt down the back of the seat. The rooflining can be taken out now.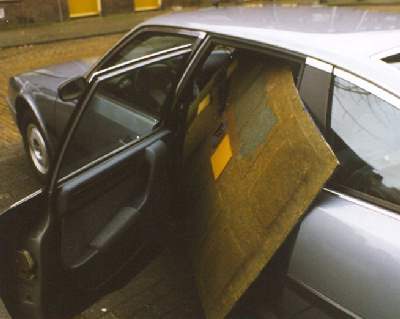
To prepare for taking the roof out you have to: remove the light and switch clusters, remove the rear sun visors, remove the front sun visors, remove the front sun visor holders, and then remove the side trimmings (works best in this order). Now two screws in the middle have to be undone and it is time to manoeuvre the rooflining out of the rear door...
Now remove the old lining from the base, you will end up like shown in picture 2.
Now prepare a piece of cloth (buy at the local market, in a store for making clothes yourself, or best: in a furniture-upholstering shop) that resembles the old lining as much as possible. It has to be stretch-quality! Otherwise it will not fit the uneven structure of the roof neatly.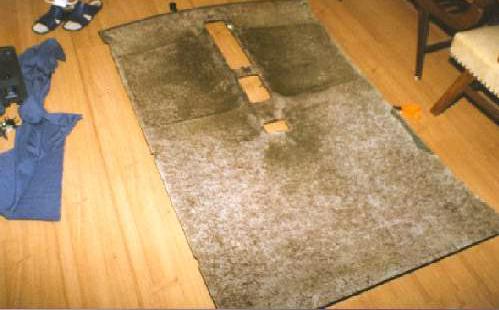
Apply glue to the rear end of the base, not too thick, with the aid of a fine applicator. Glue and applicator are shown in the next picture, I used Bison carpetglue (normally used for fixing carpets in rooms or offices), this will not stain the cloth by leaking through. Then position the new lining as shown below, making sure it won't move anymore. This because there is no tension on the rear, but the uneven front will put some tension on the lining, and you will need the fixed rear to keep it in order.
So now apply glue to the front part as shown, and put the lining on the support, using the stretchability of the cloth to make up for the uneven places in the middle and in the place where the front sun-visors fit in.
After drying holes can be made for the screws, the temperature sensor and the light and button consoles. Now fitting this in the car is a reversal of removing, but first I thought it would be nice to fit a cable in the roof to supply a third brake light to be placed at the top of the rear-window. Fitting a cable for the cell-phone aerial can be done now too.
After all, this is a simple job (took me three hours only) so no one needs to be driving his CX with its rooflining hanging down anymore.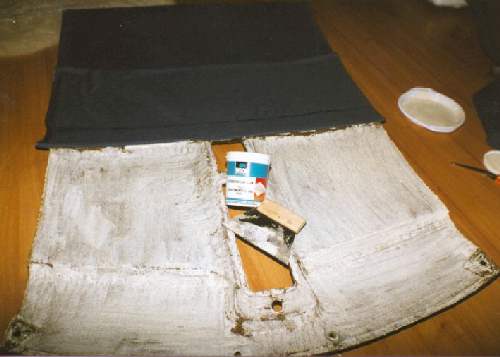
Limma nytt tyg på innertaket
Blair A 2002-05-23: My 1988 CX(A) Prestige has a bit of a problem emerging with small bits of the headliner drooping. Nothing too serious, but spoils the overall look of the interior. There is no spot larger than a Canadian 2 dollar coin. My wife, when shown this, of course hadn't noticed it, but suggested that I get out that old steam iron I have on a shelf in the garage, test it to make sure it doesn't leak scalding hot water when held upside-down, and apply some steam and heat to see if the glue can be re-activated. It seems to work on my shirts, but just a rumour! Has anyone done this, or can anyone suggest a different approach?Paul: If it's the same as my S1 GTi and S2 Prestige the cloth is foam-backed. The stuff I'm thinking of look/feels a little like felt - I've only ever seen it on cars without a sunroof, so if you have one, it's probably different cloth. In my experience, the reason the headlining falls down is that the foam perishes with age. The glue is still doing it's job - sticking foam to panel - but the foam isn't. If you have this type of cloth, it's unlikely that heat would help and could make things worse. I suspect the only solution is glue (either with new or old fabric). I've not got around to this yet, so I can't offer advise, but I know there are people on the list who have.
Stew K: Your brides suggestion, while ingenious means that eventually you will have ironed the whole area at considerable effort. Removing the whole base is not that difficult, it's held by clips and the pillar coverings have to come off also, but this gives you the opportunity to completely remove and reinstall the headlining while working in relative comfort. I estimate 2 hours to remove the headliner and its base.
Shane L: I think you'll find you wont have a choice other than pulling it out, and replacing the foam (& maybe the material). My father's CXturbo has done the same thing (it has no sunroof). He's ignored the problem for about a year now. Me?? I'm taller so when I get in his car the roof liner droops across my head...
Marc B: Happens to all CXes with the smooth glued in headliner (models with a sunroof or the old style rooflining don't have this problem). Apply some steam and heat to see if the glue can be re-activated? May be possible, but the problem is not the glue. The inside of the roof is some kind of fibre backing. Glued to that is a velours (velcro?) cloth with foam backing. The glue is OK, but the foam splits: half remains on the backing, the other half on the cloth, but they are disconnected. After a while everything is hanging down. Just reline the headliner with an identical cloth. A good description is on my website (red anm: se nedan!).
Blair A: Gentle ListFolk: Oh, well, re-lining the headliner it is, then. Thank you for all your responses!
Hängande innertak
CXPrestige 2005-04-01: Nu börjar innertakstyget att kittla mig på huvudet när jag kör. Det är som sagt tyget som har släppt från det formgjutna(?) innertaket. Någon som vet vad man kan göra åt det? Limma? I så fall, vilken typ av lim? Gissar att limmet ganska lätt tränger igenom tyget, vilket i min inre sinnesbild inte är så snyggt...

Connys takConny: Det går ganska enkelt att plocka ner innertaket, fäll omkull ryggstödet på H. framstol, och lirka ut hela "skivan" genom bakdörren, samma väg in igen, fast tvärtom. Jag köpte vanligt fleece-tyg, för 120 kr och limmade med mattlim, funkar perfekt, jag valde dessutom en ljusare färg än original, vilket gjorde att "Murrigheten" inne i bilen försvann. Kika in i mitt fotoalbum (bilden t v är därifrån!)
Error: Använd INTE 3M's svindyra textillim på sprayburk. Mitt innertak har börjat hänga ner igen.
Adde: Vilket lim använde du, och hur applicerade du limmet på skivan? Jag instämmer med error vad gäller spraylimmet fråm 3M. Det är inte värt pengarna, men det är ju väldigt viktigt att man applicerar limmet jämnt och inte för tjockt, och då fungerar väl bara applicering via spraymetoden
Conny: När innertaks-skivan var utplockad, så rensade jag den från allt löst ludd och gamla tygrester, sen ställde jag in den i förrådet, tillsammans men en värmefläkt, och de fick stå där tillsammans i ett dygn, så att skivan blev ordentligt torr. Tyget jag använde var fleece, men det viktigaste är nog att det är lite töjbart, så att det går att forma efter skivans konturer, sen penslade jag på CascoFlex Golv/Vägglim artnr. 3442 på skivan. Lät det torka en kvart ungefär, sen började jag bakifrån på skivan, och liksom rullade ut tyget, samtidigt som jag "gnussade" fast det. Vet inte om detta är så viktigt, men jag stannade strax efter hålet till belysningen för baksätet, för att allt skulle få fastna ordentligt, väntade några timmar, sedan limmade jag resten, framåt och"gnussade" fast tyget även där, men det är ganska mycket ojämnheter där, så det är lite pilligt.
Slutligen några råd : När man monterar ner innertaket så måste man även lätta på inredningsdetaljerna på samtliga stolpar, A+B+C-stolparna och om man inte har en sagolik tur, så kommer plastklippsen att gå sönder, jag trodde att dessa skulle vara en omöjlighet att få tag i, så jag försökte inte ens, förrns efteråt, *mitt pucko* de finns i drivor hos citroenhandlaren, kostar 1,50 kr. st. går åt kanske 3-5 st. OM man vill, så kan man ju även passa på att dra sladdar till ett eventuellt högt bromsljus, ny antennkabel, eller vad man kan tänkas vilja ha däruppe.
Jonsto: Skal til med samme jobben på minst 2 biler. Det er spesielt interesant å høre hvilket lim dere bruker. Det limet du brukte, wisslan, er det fargeløst? Det trekker ikke gjennom og blir stygt på mørkere materialer? Mener det skal finnes lim som er beregnet på tøy (tyg) men vet ikke om det er noe bedre. Håper CX Prestige legger inn sine erfaringer når han er ferdig.
Conny: Jag använde ett ljust tyg tillsammans med ett ljust lim, och fick därför inte något färg-genomslag, men med ett mörkt tunnt tyg, vete tusan hur det blir. Men å andra sidan: karamellfärg i limburken då? Så att limmet får samma färg som tyget?
|
|
|