Lädervård en hel vetenskap
Bosse Bildoktorn i Bilatlas katalog 2008:
 Vårda lädret rätt
När en läderklädsel börjar få tork-sprickor smetar en del människor på tjockt med läderfett. Många låter de kladdiga stolarna "stå och dra" över natten så att lädret ska bli riktigt mättat. Lädret blir då överfettat och härsknar som smör i solsken vilket i sin tur gör det skört.
Många gånger rengörs inte heller lädret innan fettet stryks på. Smutsen följer i så fall med fettet ned i lädret. Tack vare detta härsknar lädret ännu snabbare och det totala förfallet accelererar.
Hur skall man då vårda sin läderklädsel? Ja, det beror på vilken sorts läder det gäller. Regel nummer ett är dock att hålla det rent. Smuts tränger annars ned i lädrets porer och veck varpå ytan förstörs och blir skör även utan härsknande fett. Dammsug först. Tvätta sedan med speciellt läder-rengöringsmedel, men läs bruksanvisningen innan du gör rent!
|
|
Fläckar
Matt läder såsom "buffel" vill gärna mörkna något när man har tvättat det men det är inte mycket att göra åt. Om speciellt läderrengörningsmedel ska användas på matt läder så bör man först prova på något ställe där det inte syns, ty lädret kan mörkna betydligt.
Fläckar på läder ska inte angripas med starka medel. De förstör ytskiktet, i värsta fall går färgen bort. De sugs även upp av skinnet och sprider sig sedan åt sidorna varefter ytbehandlingen löses upp bakifrån. Om en fläck inte går bort med läderrengörning så är det bättre att låta det vara. Många fläckar
vandrar med tiden ned i lädret och blir då allt svagare. Vissa fläckar, exempelvis ett streck av en kulspetspenna kan med tiden försvinna helt. Efter en
rostskyddsbehandling kan man ibland få stänk på klädseln. Använd då inte de "tvätta rent"-prylar som man brukar få med sig från rostskyddaren. Tvätta
istället med läderrengörningsmedel.
|
|
Mjölk på kohud
Varje gång lädret har tvättats bör man massera in lite "lädermjölk" (säljs i möbelaffärerna). Det är viktigt att inte lägga på för mycket. Massera in ett
tunt lager på en liten bit i taget. Lädret ska kännas helt torrt efter behandlingen. Om inredningen inte tvättas så ofta bör lädermjölken masseras in var
tredje månad.
En gång om året bör man även massera in lite läderfett. Även detta ska masseras in så att ytan känns helt torr efter behandlingen. I vårt
klimat gör det mer skada än nytta att lägga på läderfett två gånger per år, detta är bara att rekommendera i torrt ökenklimat.
Matta lädersorter (buffel och semianilin) mörknar av lädermjölk och läderfett. De bör istället sprayas med ett färglöst impregneringsmedel avsett för textil och mocka. Dessa medel innehåller nämligen inget fett som gör lädret mörkare.
Tumreglerna för att alla typer av läderklädslar ska kunna åldras vackert är att de skonas från stark värme, uttorkning, för mycket solljus, för mycket fett, skokräm och starka rengörningsmedel.
|
|
Skinnklädsel m m
Harry S (US) 2001-08-26:
Someone had a recommendation for softening up aged leather seats. What was it? Hide food?, Lexol, Saddle soap? What is best for deep softening?
|
|
Gary M:
I used a lot of Lexol, but now my front seat is rotting a bit. But it might have been a case of too much too late though I used it before.
Jason L:
Personally I'm ambivalent about Lexol. This is good stuff: http://www.leatherique.com I use it sometimes when a car needs serious treatment. Just remember to let is soak in an bake in the car. Its not cheap though....
Lou:
On hard, stretchening old leather, i used saddle soap, then walrus grease (or sea lion grease, well that kind of fish). It stinks a lot & I did that at a time the seats had been removed to be resewed (leather go stretched, then it blows seams). I had improvement on suppleness. Anyway, I have a rare collection of palenblanket in the car to cover the seats when parked under the summer sun (coming soon). But I know there is another cream, or animal oil wich is used by english connoisseurs on they old Bentley (pre WWII, obviously) or any british classic car. but don't know exactly the name of the produce. Some says it's never too much too late, if you fid the adequate produces. Anyway if the leather is blown...
Gabor D J:
I found the following in the BMW 7 Series FAQ a few years ago (the products mentioned are mostly US):
5.3: Leather/Vinyl Care
From: CarcareSp@aol.com
Date: Mon, 18 Sep 1995 09:25:22 -0400
I am enclosing an article I wrote on the care and feeding of leather/vinyl. One section covers the restoration of seats/dashes.
The care and feeding of the leather and the vinyl components of your automotive interior are two very different processes. If you are using one product on both, that is somewhat like using gasoline as a lubricant. It will work, but not for long. I will cover the care and feeding of leather and vinyl separately.
Leather having once been used to keep the insides of a cow from falling out was designed to pass moisture through tiny pores. These tiny pores absorb human perspiration and as the water evaporates, salts contained therein remain to absorb the essential oils in the leather. This accumulation of salts and other grunge should be cleaned from the leather about twice a year (more often if the seats get more than their fair share of your leftover sweat). The loss of oils within the leather is the first step to hardening, cracking and shrinkage. Leather dashes are very prone to hardening and shrinking. Your dash is subjected to the destructive UV rays and heat concentrated by the windshield. The leather (or vinyl) of your dash rests upon a metal backing that acts like a frying pan. This "frying" drives the essential oils from the leather causing premature shrinkage, cracking and hardening. Thus a dash should be treated more often than the seats or door panels.
Cleaning leather may be accomplished by using a mild soap and water, or a specifically designed leather cleaner. Of all the products I have tried, I still like Lexol pH Cleaner. It is pH balanced, and gentle. All cleaners will rehydrate the leftover salts and grime and wash them from the leather fibers. Use only leather products on leather, do not use vinyl cleaners as these products tend to be much harsher and may not be that beneficial to the leather. Any cleaner should be rinsed thoroughly from the leather. I have tried spraying off with a hose, but that just seemed to fill the car with soapy water (a hole drilled in the floor was needed to drain it out - just kidding). I went back to using a damp cloth and repeatedly wiping down the leather. Once the leather is clean, a conditioner should be used to restore lost oils and emollients. There are several conditioners on the market. Two of my favorites over the years are Lexol Conditioner and Tony Nancy Leather Conditioner. These two seem to be the most easily absorbed into the leather fibers and tend to leave a relatively less "greasy" finish than any of the other products I have tried. Another good product is Connoly
Hide Food. This product is made from rendered animal parts and will turn rancid in about two years. This and the distinctive "cow" smell removes it from my top two list (I spent too much time milking the south end of a north pointing cow, so am not a fan of cow smells). Zymol makes a product called "Leather Treat". It does not, in my humble opinion, do any better job than the much less expensive Lexol or Tony Nancy products. Again, do not use a vinyl product as a conditioner on leather and above all try to avoid silicone based products. The silicone oil will dissolve out the leather's natural oils and tend make the leather sticky. Silicone has a very high electrostatic attraction, so will invite every dust particle within miles to set up camp in your interior. Apply the conditioner to a soft cloth and work into the leather, allow to be absorbed into the fibers and then buff off the excess.
You may condition the leather as often as you wish. The leather will tell you if you apply too much or apply too often. The leather fibers will just not absorb the excess.
If your leather has hardened or needs some intensive softening, there is a really nifty product called "Surflex Leather Soffener". This product is made from natural and synthetic oils that restore the natural softness to neglected leather. Clean the leather and then apply a liberal coat of Soffener. Allow to penetrate the leather for about 24 hours. Wipe off the excess. If it needs an additional application, repeat the above. For really bad areas, cover with plastic and allow to sit for a few days. Once the leather is sufficiently softened, allow to "cure" for another 24 hours and buff off any excess. You are done. I jokingly say this product will turn a dog's rawhide chew into a kid glove. I have had some luck with leather dashes with this method. Once the leather has softened, I have been able to gently tuck it back under the edges of the trim and windshield clips. This is a lot cheaper than a new dash and may be worth a try before spending a ton of money.
If your leather or vinyl has scuff marks, scratches or areas that the surface color had been removed, you may refinish it yourself The key is another Suflex product. The Suflex Colorant & Finish for Flexible Surfaces may be matched to the exact color required. Any interior leather or vinyl surface may be refinished. It is not recommended to spot finish any area. If your seat bolsters have belt loop scuff marks, you should refinish the entire front of the seat. I usually do from welting to welting. This provides a visual break that does not make the non refinished areas appear quite as shabby. But then why not do the whole seat, dash, or door panel? Start by cleaning the area(s) to be refinished with a suitable Organic Solvent. I prefer Wurth Citrus Degreaser or P21S Total Auto Wash. Prior to usage, test all solvents on an area that does not show. I use the
excess on the underside of the seat to test colorfastness of the finish. Spray the solvent on a soft lint free cloth, and then wipe down the surface(s). Repeat after a few minutes. Rinse with a damp cloth and allow to dry thoroughly (at least 24 hours). The manufacturer of Surflex says to strip the old finish off using lacquer thinner, commercial paint remover or C-P Stripper. I don't, because most interiors are not in that bad a shape and I have never found it necessary (They also recommend lightly sanding the area prior to usage, I don't do that either - no guts). Mix the Surflex completely and use it like a wood stain. I use a small piece of lint free cloth and work the Surflex into the leather or vinyl just as if I were staining wood. Once the desired color of finish is achieved, allow to dry undisturbed for at least 24 hours.
I allow the surface to "harden off" for about 2 weeks before applying any conditioners to leather or vinyl protectants to vinyl parts. I have not had a lot of luck refinishing a dark leather or vinyl a lighter color. The old color tends to show through in small "cracks" and the whole panel seems to be "muddy". Maybe if you strip off all the old finish, it would look better. Someday, I will get an old seat and give it a try.
The Surflex Black Colorant works great on black bumpers, black spoilers or black rubber/vinyl trim that has been scratched or scuffed. Clean the entire part thoroughly with Wurth Citrus Degreaser, rinse and dry thoroughly. Stain the area with the Colorant and allow to dry. It will look like new. After about 3 weeks hardening off, coat with a protective coating of Mequiar #42 Rubber Treatment or Black Again.
Small cuts, cracks or holes in leather may be partially repaired using another Surflex product called Flex-Fill. This is a semi-flexible cosmetic filling material. You use it like a spackle compound. It will take the Surflex colorant similar to leather or vinyl. I have been able to repair several damaged areas and hide them so they are not visible to the casual observer. Will it make a three inch crack in your dash look like new? No, but it may help hide it so that it isn't quite so obvious. I have found that forcing Flex-Fill under the repaired area and forming an inverted T patch works best. Once the patch is dry, sand lightly to blend in with the leather or vinyl. Clean the area thoroughly and refinish with the Surflex Colorant.
This is a learned skill, so you should practice on a test piece of leather or vinyl. Perfect your techniques before you tackle your expensive interior.
Vinyl is the carefully prepared hydes of virgin pampered Arctic Naugas. Many Naugas must die to furnish enough material for just one interior panel.
The dash, door panels, seat backs, and numerous other interior/exterior trim pieces are usually vinyl. Vinyl may be viewed as raw semi-liquid vinyls that are held in place by a solid vinyl "skin" (this description is forillustration only and not a PhD chemical dissertation ).
The dash and other vinyl parts of your car are constantly bombarded by UV that breaks down the molecules of the skin, allowing the raw vinyls to escape (off-gassing). These free vinyls then may deposit themselves on the glass, forming a haze that is difficult to remove. If you have such a haze, it is probably your dash that has decided to pick up stakes and migrate. Silicone based vinyl dressing products do not usually contain UV protectants, and the silicone may act as a magnifying glass, intensifying the UV degradation. Silicone oil may also dissolve the essential oils in the vinyl skin, hastening the premature formation of cracks in the vinyl skin. A quality vinyl protectant will contain a UV protectant and essential oils to replace lost oils from the vinyl. These protectants are expensive, so the K-Mart specials may do more harm than good. Silicone also has very strong electrostatic attraction which may be considered beneficial in that it will tend to stay where it is placed, but will also attract every dust particle in the surrounding three counties.
Any vinyl protectant should be applied to a soft cloth and worked into the surface. After a few moments of allowing it to work into the surface, buff off the excess. The dash should be treated more often than any other area, as it is subject to the most severe attack by UV and heat. My personal favorite vinyl protectant is Lexol Vinyex Spray. This in my humble opinion has it all. A very strong UV protectant, essential oils, anti-static (helps keep dust off) and a soft patina finish. Harly Polyguard - - This used to be my favorite, till I lost my heart to Vinylex. Leaves a touch more shine to the finish than Vinylex. Somethin' Else This is the sister to Black Again. Has all the right ingredients and people who love it are died in the wool. I prefer the Vinylex, but that's only a subjective opinion. It leaves a "new car" smell. I think that is why it is not my favorite. I am not a fan of artificial smells. Harly Interior Magic - An old standby that leaves a lemon scent. Some people love it. I don't think a car should smell like lemons, but that's my opinion and I could be wrong.
Zymol Vinyl - Another tropical oil product. Leaves a pina colada smell. Diehards will defend this product to the death. I just think it is to much $. Meguiar #40 - A great product that cleans and protects. Does not leave a slippery finish. Meguiar #39 - A very strong cleaner. This should be used carefully and very infrequently. It will clean just about anything out of vinyl. Must be followed by #40 or other vinyl protectant. A great cleaner for plastic Targa tops. Tony Nancy Rubber/Vinyl Cleaner- I don't recommend use on the inside. The smell is a bit much for me (reminds me of dead rats).
Some people do and swear by it. Sonax Cockpit Spray - This is a German product that is designed for German vinyl. Does a great job, but leaves a little more shine to the surface than I care for. There are a gaggle of users who love it. Wurth Cockpit Spray - ditto above. Wurth people don't like Sonax and vice versa. Formula 303 - This leaves an Armour All type of high gloss shine to the vinyl. I personally don't like this type of finish. Some people do, so feel comfortable using it. All of the above products are not based upon silicone.
I hope that the above has shed some light on the subject leather and vinyl care. If there are any questions, please do not hesitate to call or write. If you can't find the products locally, I stock all of them except the Formula 303 and would be glad to send a product description/price package by mail.
Larry Reynolds, Car Care Specialties, Inc, e-mail carcaresp@aol.com
|
Leather Steering Wheel Refurb, Refinishing a single spoke wheel
Steelcityul 2011-01-12:
I decided some time ago that something must be done about the state of the single spoke steering wheel in the SED. The leather finish was coming off in various places and the stitching had burst here and there so the initial thought was to buy a better one. However the only one I saw went for more than I could justify so that meant the other options was to swap it back to a 2 spoke wheel or refurbish the one already fitted. One of the things I really liked about the series 1 was that wonderful layout of the dash, switch gear and the single spoke wheel that gives such a great view of it all, so refurbish was the way to go.
Checking the web brought up conflicting advice as to what should and shouldn't be done to leather interiors. The advice that made the most sense to me was that water based 'flexible' dyes work best. So after further searching I settled on a kit from the Furniture Clinic which includes - leather prep, leather cleaner, water based dye, gloss sealer, satin sealer, abrasive pad, cotton wool balls, cloth, foam block, airbrush and propellant.
During the search for the leather repair kit I ordered some waxed linen thread to restitch the leather cover to the wheel. This was bought from an ebay seller and arrived very quickly. Restitching the leather took about 2 hours using the same stitch pattern as was originally used. The thread was 5 metres long so I started in the middle and stitched both ways.
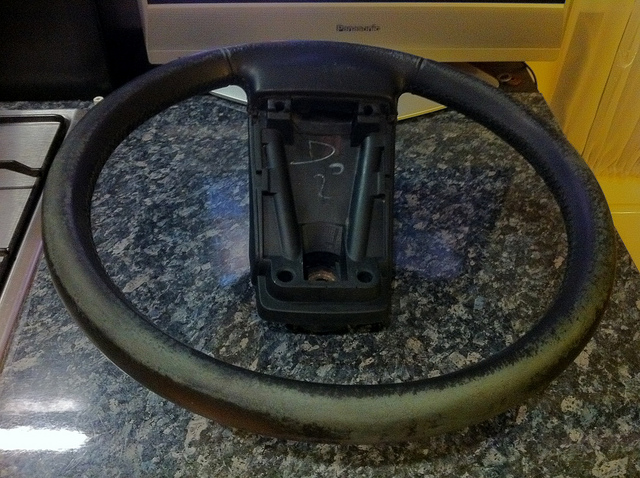
Following the instructions in the kit I put some leather prep on a cotton wool ball and covered it with the abrasive pad (scotchbrite pad), after a good scrubbing, changing the cotton wool ball and using a clean bit of pad, all the leather finish was removed, a good wipe over with more leather prep removed any remaining residue. Next a thorough wipe with the leather cleaner removed the last of the greases/oils that could be contaminating the leather was needed. After this a gentle sanding with 1500 grit silicon carbide paper smoothed out the worn patches and provided a good key for the dye. Another wipe over with the leather prep and leather cleaner was needed followed with about an hours drying time to ensure the leather cleaners had evaporated completely.
Heres how it looks after those first steps:
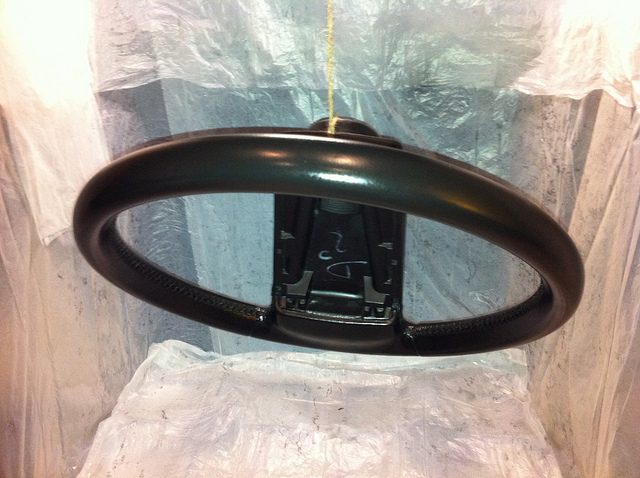
 After several sponge applied coats and a couple of sprayed coats this is how it looks:
|
|
White Exec:
A really fantastic job, Steve! Thanks too for all the product and technique detail. Quite agree with you about the appeal of the single-spoke wheel, which we really liked on our old BX, and is hallmark Citroen. We have a RAV4 whose wheel and gear-lever could benefit from same treatment.
|


